|
 |
|
|
|
|
 |
|
Log In
|
|
|
|
|
| 
|
|
Attention all
Automotive Scope Users
Pico Automotive Scope software now sports a new Waveform Library browser.
Must own PicoScope to view.
See details here |
|
|
|

|
|
 |
| Credit Cards Accepted |
|
|
|
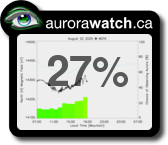
Aurora Probability
Northern US States and
Southern Canadian States.
For more precise predictions
go to
https://www.swpc.noaa.gov
|
|
|
|
|
IP Networking for remote data logging
|
 |
| The PicoLog IP socket facility is used to take measurements on one or more computers, but record the data on another computer. |
US Prices
CDN Prices
Privacy and Security
|
The server is used to take measurements with PicoLog running while another computer the Client, requests the data via an IP network.
On the server:
- Press Start
- Select Run...
- Type in winipcfg.exe
- Note the server name
On the client:
- Open a DOS box
- Type in ping followed by the server name
- The computer will display the time taken to send a message to the server and receive a response. Check that it is working and note the time.
On the server:
- Start up PicoLog
- Select File
- Select Preferences
- Select IP Sockets
- Check the Enable Server box
- Press Ok
- Exit and restart PicoLog
- Set up the PicoLog to measure the channels that you require

On the client:
- Start up PicoLog
- Select File
- Select Preferences
- Select IP Sockets
- Check the Enable Client box
- Exit and restart PicoLog
- Select New Settings
- Enter recording details and press OK
- Enter the sampling details and press OK
- Select Socket in the converter type combo box
- Press OK
- Type in the server name, eg fred. Note: server names are case sensitive!!! Fred is not the same as fred
- Press Connect. The computer should now display the channels from the server
- Click on one of the channels
- If you want to change the name, type in the local name
- Press OK. The channel you selected is marked with an X
- Repeat for each of the channels
- Press OK. The monitor window should now display the readings from the server
|
|
|
|
|
|
|